I remember the exact spot on Buford highway where the thought “Electric cars are for me!” snapped into my brain. My son was with me that day, during a test drive, and he saw it happen and he knew what it meant: his dad would be hooked on these stupid looking electric cars. Goodbye to the stylish car he wished I’d buy, and hello nerd fest!
It’s not that bad, really. He forgave me, and I’ve really enjoyed driving several electric cars since 2012. My first was an old-style Nissan LEAF, then a Ford Focus Electric and now I drive new style 2020 Nissan LEAF Plus. This one has a much larger battery. I didn’t think 200+ miles of range would be that big of a deal, but it is – its great.
Charging an electric car at home is possible using a standard household 120V outlet, but its slow. I decided early on to splurge on a Level 2 charger, which needs to be wired in at 240V, but its faster. A full charge still takes hours and hours, but typically an overnight charge always gets me to 100%. I use the LCS-25 model from Clipper Creek, which is great but there’s an issue: it’s not compatible with my new car’s charger timer (a known issue with this model). This gave me an idea though: how about I build my own timer, and also fit it out with power measurement so I could know how much electricity the car was using? This would be… a smart car charger. Actually, the proper term is EVSE – Electric Vehicle Supply Equipment. A smart EVSE, compatible with Home Assistant – that’s my next project.
Electrical Design
This project is really just a remote control on/off switch, controlling the power connection to my LSC-25. When “on”, power flows to the EVSE and to the car as normal. When “off” – nothing. Just like a light switch.
A “contactor” is basically a big relay, acting as a on/off switch for large electrical loads like air conditioners, and is perfect for this application. I bought a general purpose contactor for less than $10, and its the large black block at the top of the picture.
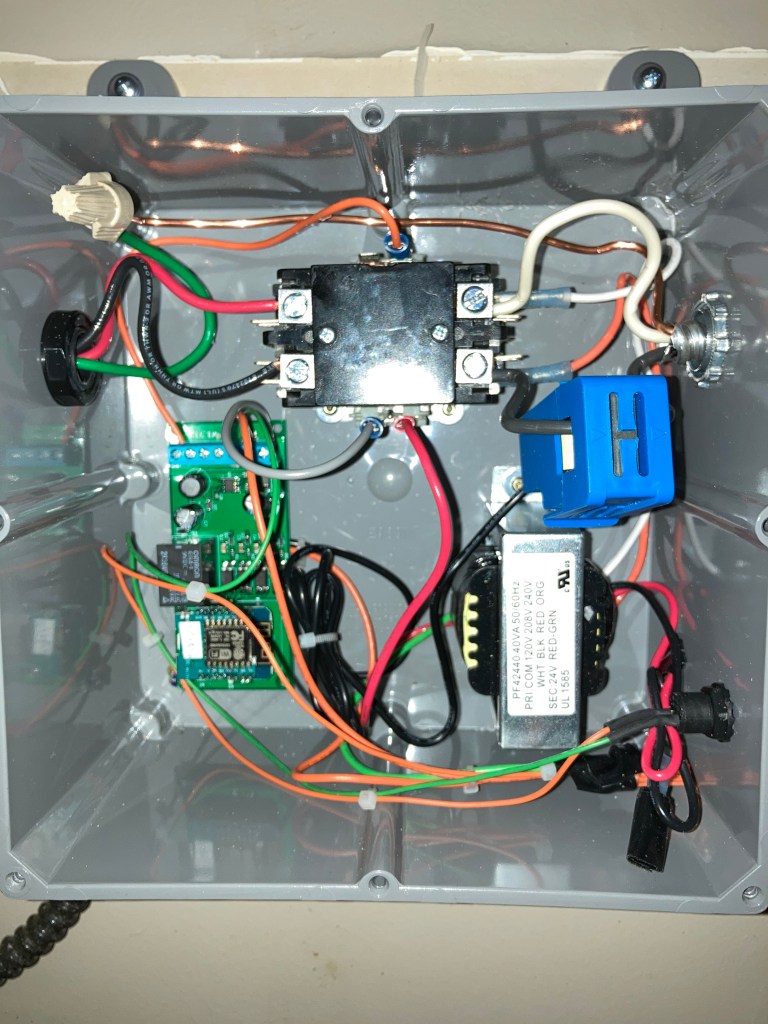
This project again uses the ESP8266 and ESPHome. Rather than design a new circuit board, I’m using an extra board from my HVAC monitor project. A 240V to 24V transformer is the power source for the HVAC monitor, and a relay on that board controls the 24VAC to engage the contactor. So we have a small relay controlling what is effectively a bigger relay. I mounted everything in a nice big plastic electrical box, which ironically was the most expensive part of the project!
To measure the current (which lets me determine power draw) I’m using a CT clamp, which cost around $12. Its the blue thing in the photo. This allows the ESP8266 to safely monitor the electrical current while being isolated from high voltages. It’s very easy to integrate with ESPHome, which already has support for these devices. There was a calibration phase where I used the CT clamp on a known load, and with this information I set up the CT clamp using YAML:
sensor:
– platform: adc
pin: A0
id: evse_sensor
– platform: ct_clamp
sensor: evse_sensor
name: “EVSE kW”
update_interval: 60s
accuracy_decimals: 3
id: evse_power_kw
filters:
– calibrate_linear:
– 0 -> 0
– 0.11 -> 2.200
It’s really that simple. The last line is the calibration constant.
All control and setup of this project is done through Home Assistant. Here is what the control screen on Home Assistant looks like:
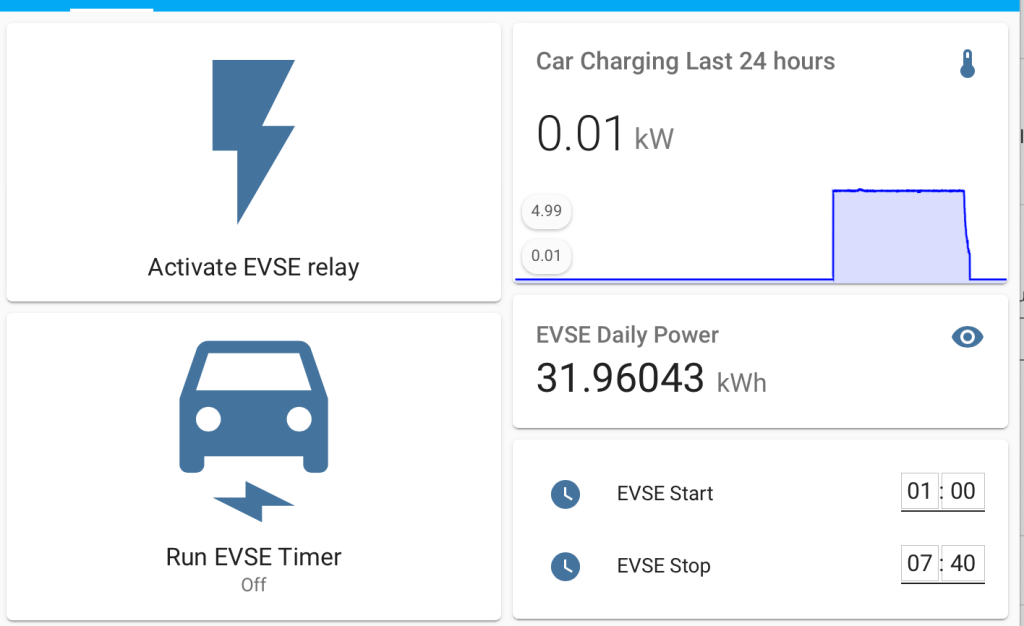
This shows the car charging overnight. I set the timer to start at 1AM, and end at 7:40 AM, and the graph shows the charging profile. The car charged at a constant rate of around 4.8 kW for most of the time, then started ramping down during the last bit of charging as the car reached near 100% full battery. I often charge the car to 80% or 90%, but this time I filled it almost all the way.
I like the EVSE Daily Power measurement, and am working on a way to keep monthly and yearly statistics. Today my car used around 32 kWh, which is $3.84 assuming a rate of 12 cents per kWh. The battery went from around 45% to around 98% full, and that amount of electricity represents maybe 125 or 130 miles or so.
Mission accomplished: I have a working EVSE timer, I can measure the actual power used for charging my car, and it was easily integrated with Home Assistant.
