The Nest is a nice thermostat. It looks good a works well (except for the ‘swing’ issue – see my this page for info…) Until about a year ago, Home Assistant could communicate with a Nest thermostat to get status and monitor what’s going on. But not anymore! Google bought Nest and then Google removed the Nest API, making Nest inaccessible to Home Assistant. Having two Nests, I wanted to fix that, so I created a custom way to monitor what the Nest – or any thermostat – is doing.
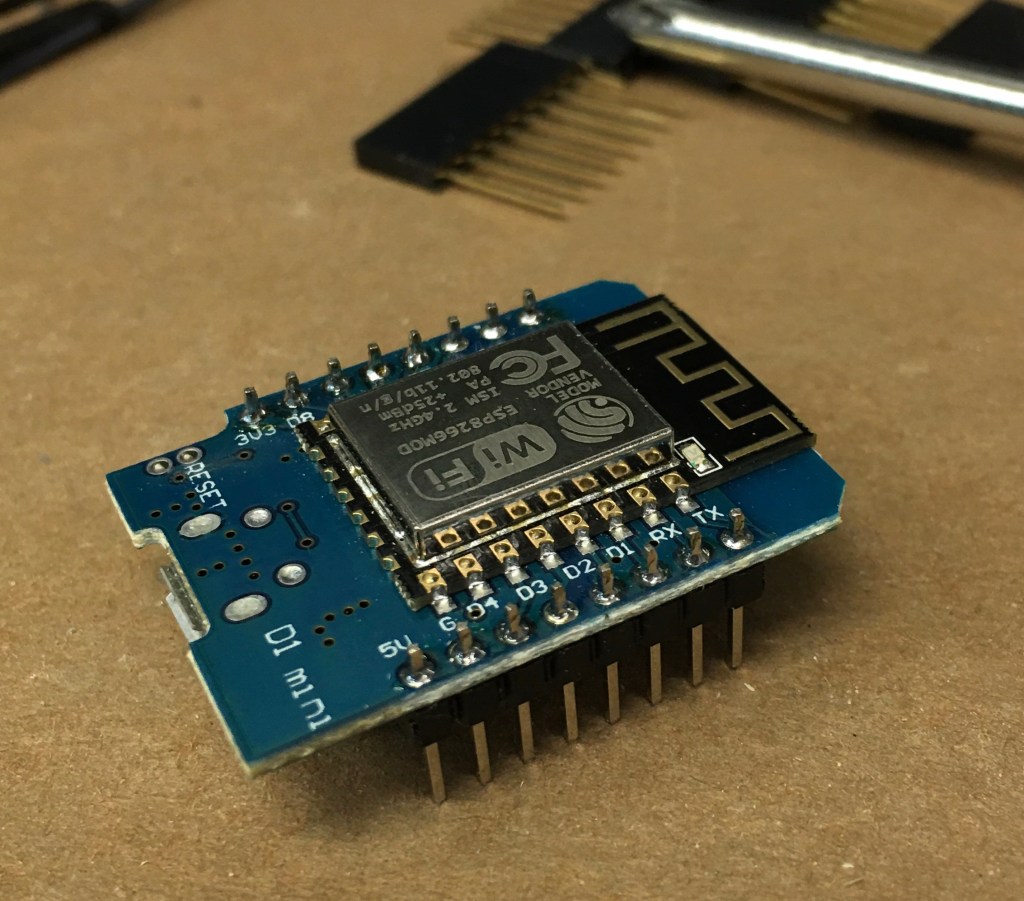
This project is based on the ESP8266, which is a very handy device that connects via WiFi and has a few input/output lines for controlling and detection. The best thing about it is … the price! For this project I used this version from Amazon, which works out to be less than $3 each. That’s affordable.
The custom part of this project involves building a circuit that can detect the 24VAC signals that the HVAC system uses, and convert these to the proper signal levels to be monitored by the ESP8266. I designed this circuit and laid out a PCB using KiCad, and had it built by PCBgogo. This is a very affordable option for creating your own circuit boards. Around $33 gets 10 boards in your hand in less than a week.
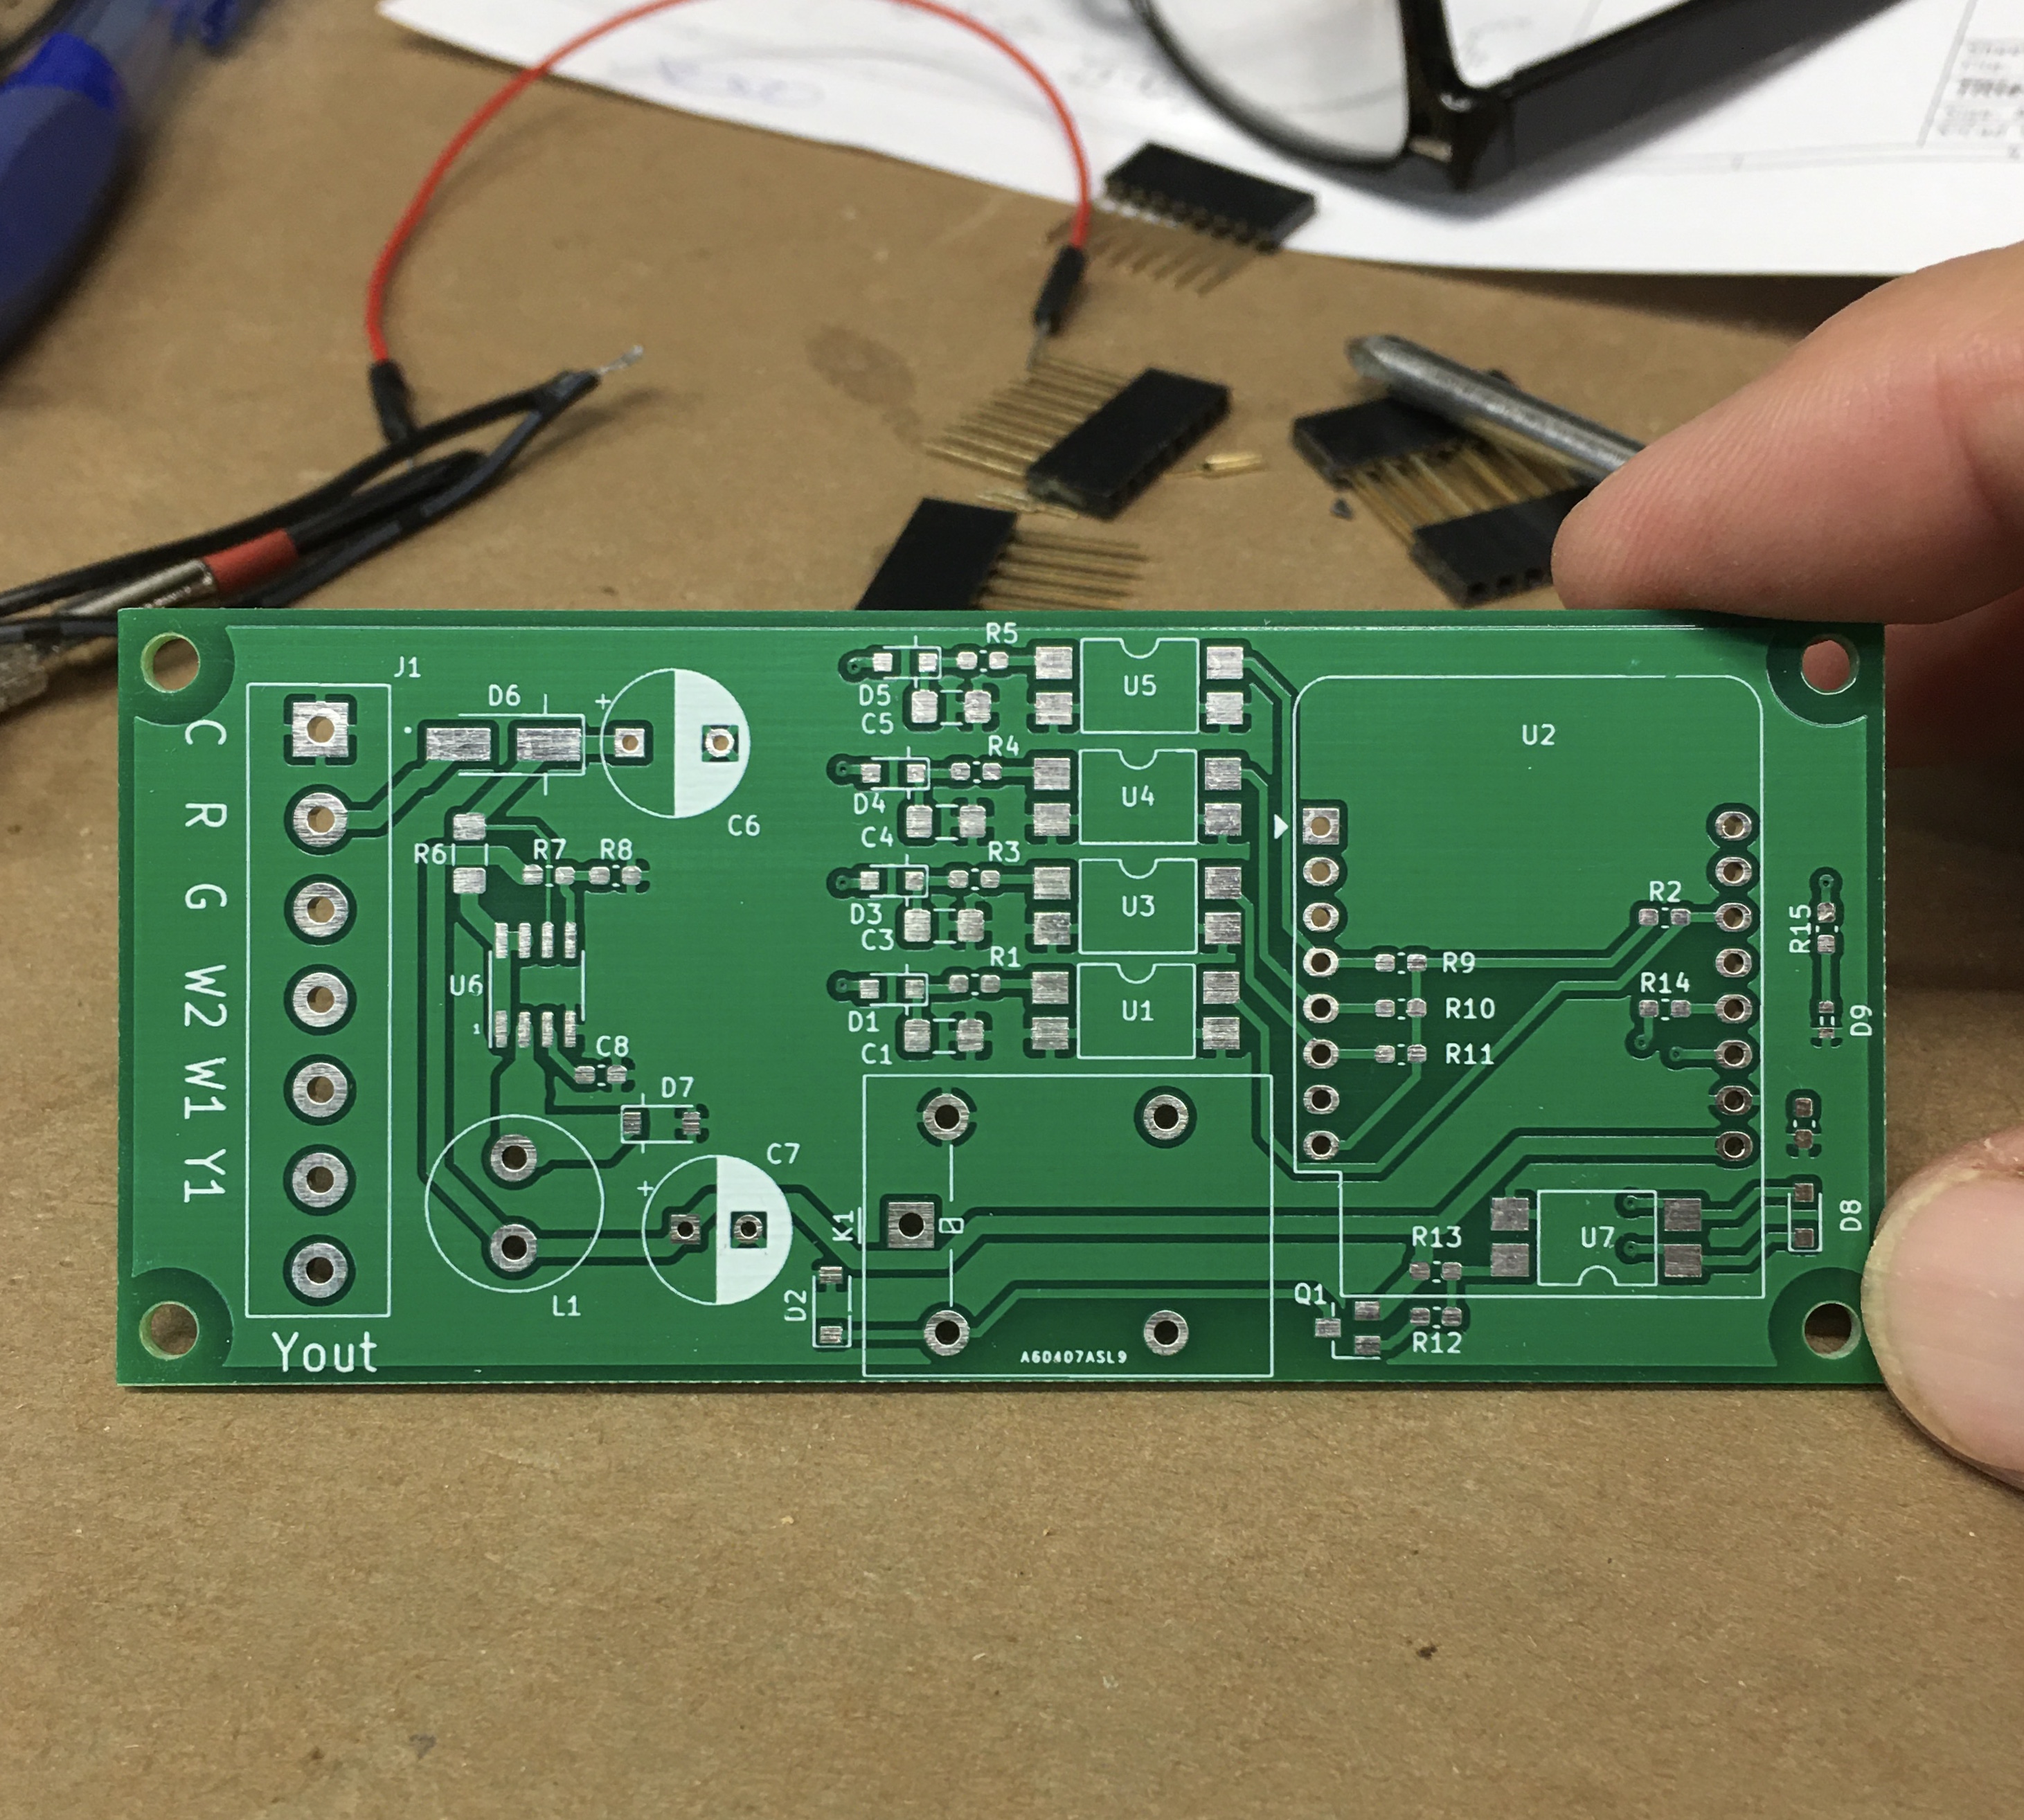
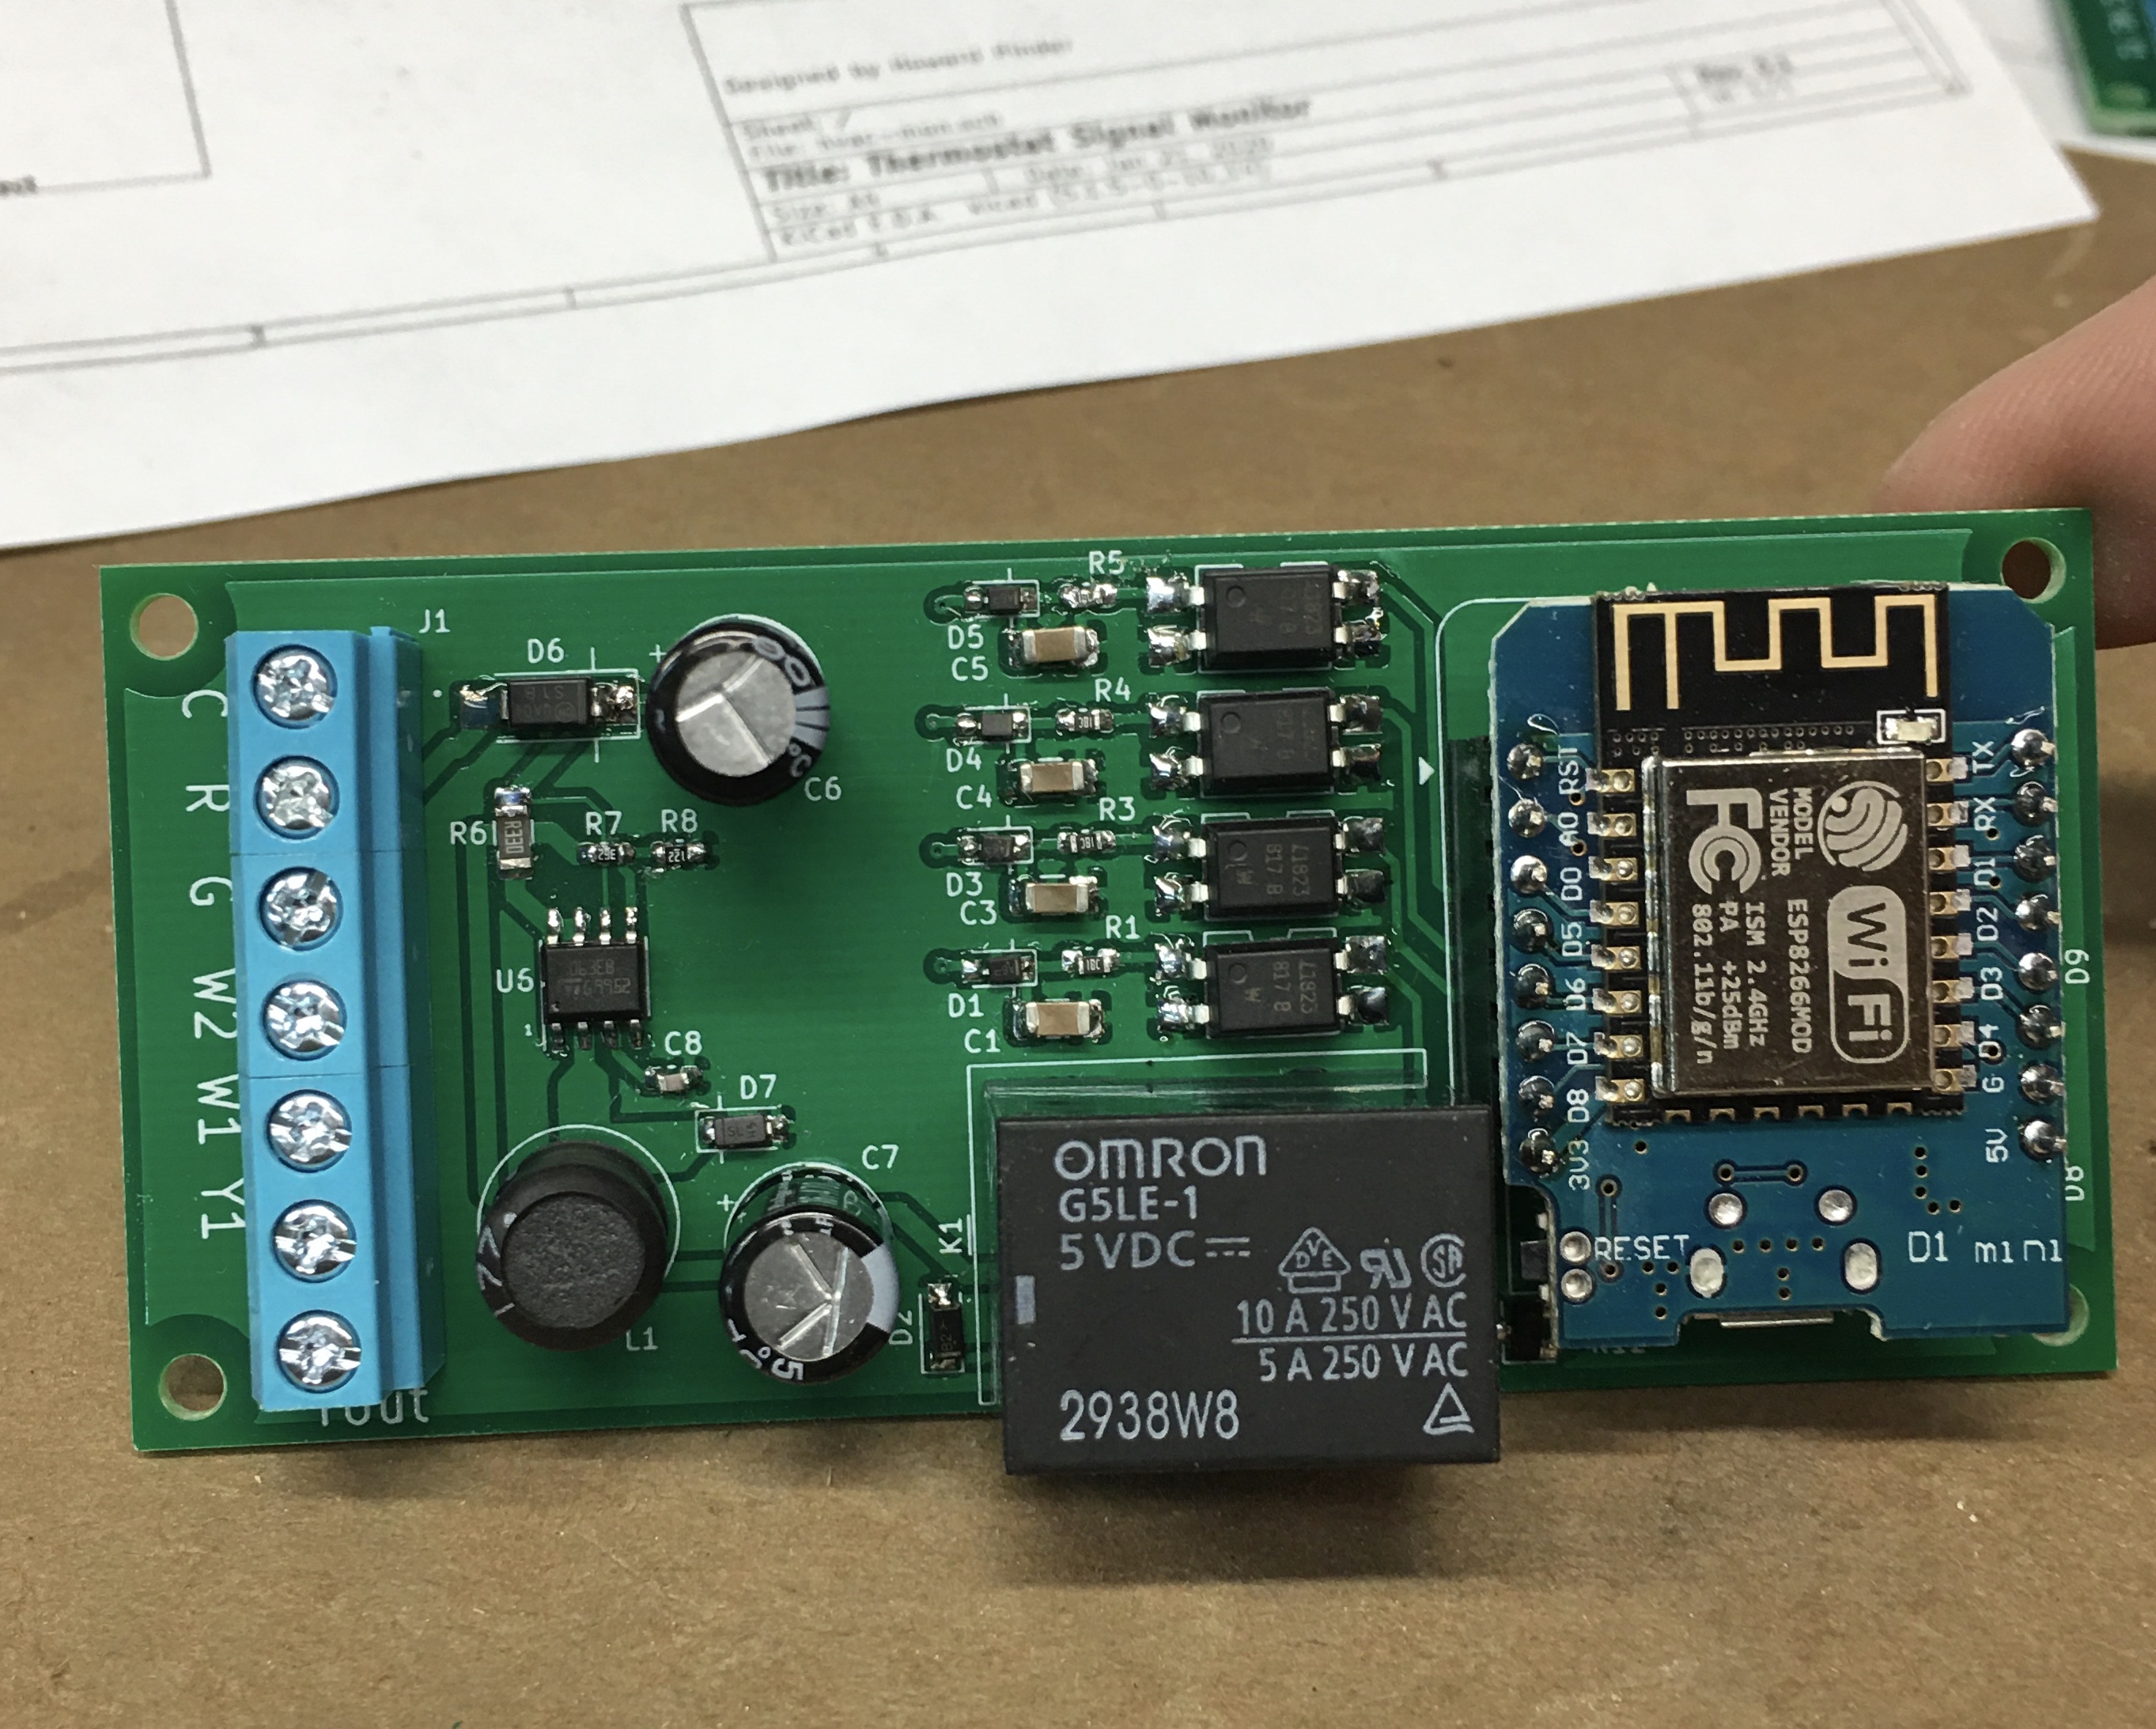
Here’s a view of the bare board, and one with parts populated. The parts were ordered from DigiKey, and I did the soldering myself (not afraid of those little 0603 parts).
The HVACmon circuit consists of the following sections:
- a power supply that converts 24VAC to +5VDC for local power
- signal conditioners to convert the 24VAC heat/cool signals to the 3.3VDC level used by the ESP8266
- a relay and driver for implementing an optional cooling defeat feature.
- and of course, the ESP8266
Here is the schematic:
Using this with Home Assistant
The purpose of HVACmon is to monitor the HVAC control signals, and report this back to Home Assistant via WiFi. So the software running on the ESP8266 is really very simple: monitor, and report. But writing software for an embedded microcontroller can get complicated, especially knowing how to interface with HA. Luckily I didn’t need to do any of that. There’s a wonderful HA add-on called ESPHome, which allows you to “program” the ESP8266 without writing any code, just by creating a YAML file (think of it as a configuration file). ESPHome takes care of creating the device software, compiling/linking it, and even downloading it into the device. Updates can be done via WiFi, which makes things very easy to update. This is a very useful add-on.
In case you are interested, the .yaml config file is found here.
Looking at this file, you’ll see it defines the names of what is being measured (Cooling, Heating, HeatingSecondary, and Fan) and which pins they attach to on the ESP8266. For a monitoring function like this, it’s really that simple. Because of how ESPHome is integrated with Home Assistant, when this device is deployed the proper nodes will show up automatically in HA with no further work. From there it is easy to create a graph of HVAC usage.
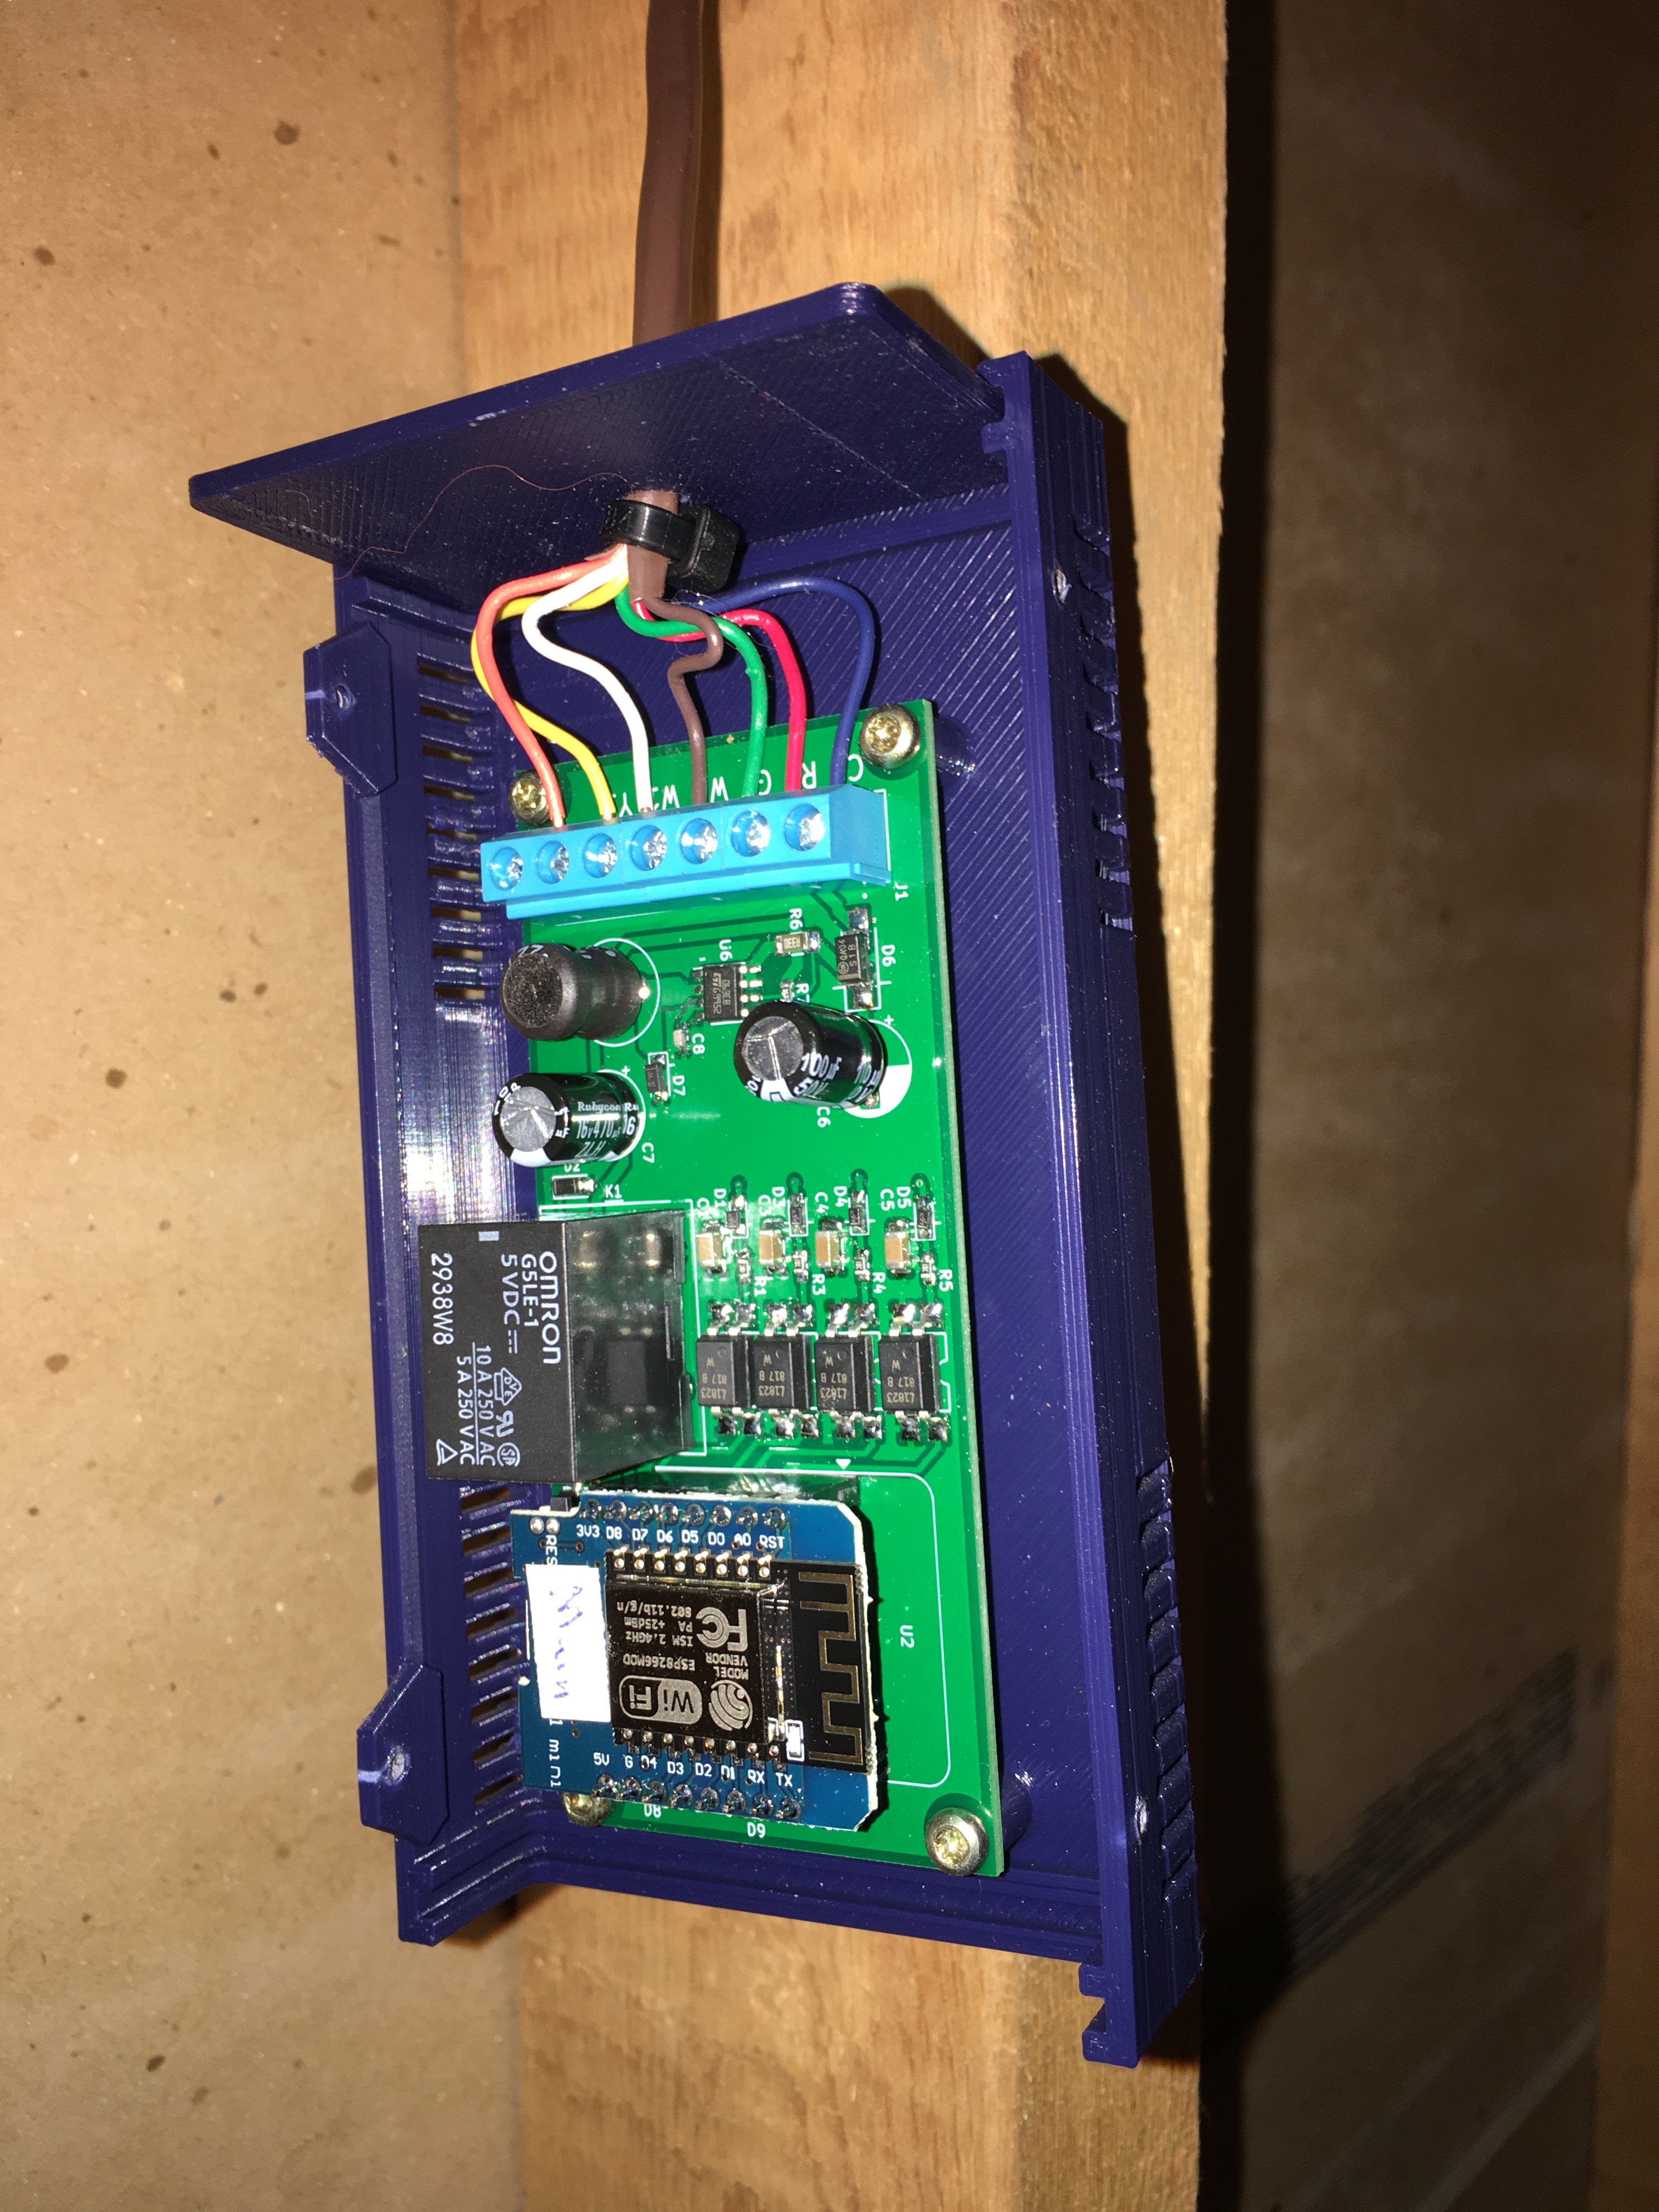
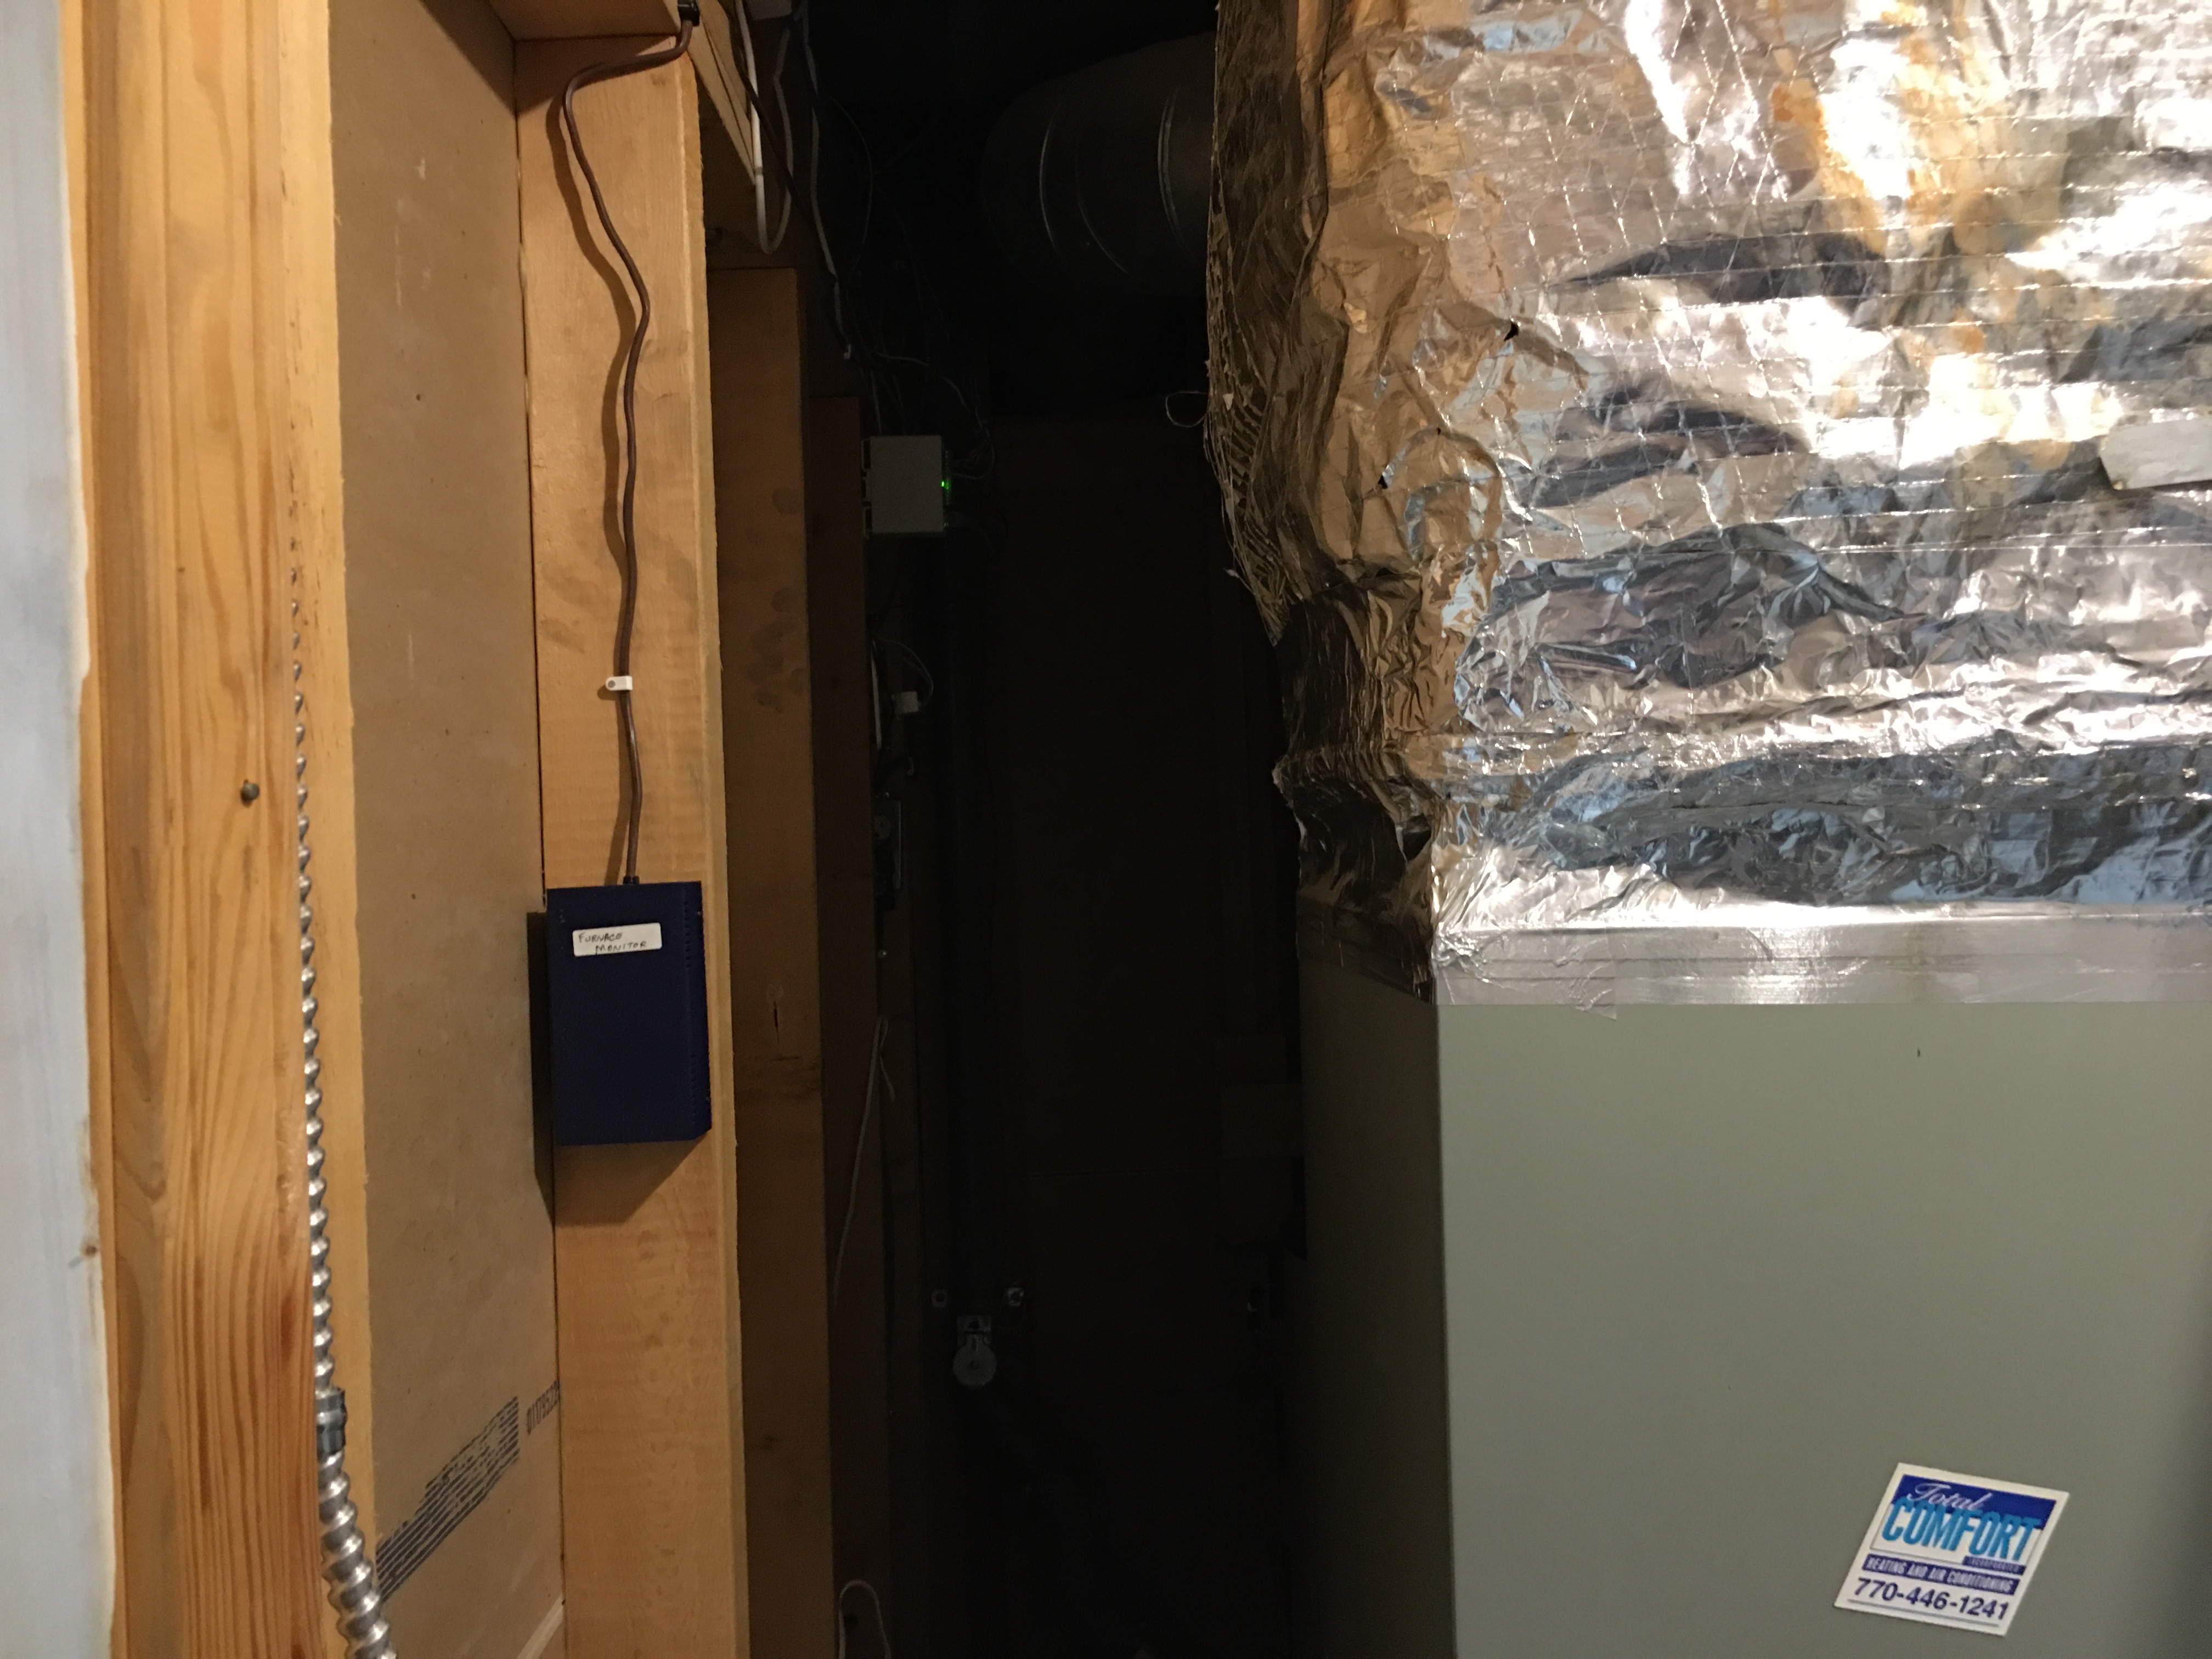
The completed HVACmon device is installed by attaching it to the thermostat control wires. Instead of connecting directly to the wires at the thermostat, I connected it to those same wires where they hook up to the HVAC unit. I ran a bundle of 7 wires (standard HVAC wiring) out of the HVAC unit, up to the ceiling and over to the HVACmon device mounted on the wall. I did not want to install HVACmon within the HVAC unit itself. I wasn’t sure it was entirely safe and fireproof, plus also I wasn’t sure if WiFi would work from in there. So instead it is mounted on the wall. Notice that nice 3D-printed case? It was made using a parametric model downloaded from Thingiverse.
What can you do with it?
The main point of this project is to monitor what the HVAC system is doing. It’s summer now, so I’m focused on how often the A/C is running. This is my biggest power draw and leads to high electric bills in the summer, so its worth paying attention to.
Here’s the kind of history graph you can get from Home Assistant, showing usage over the last 24 hour period:
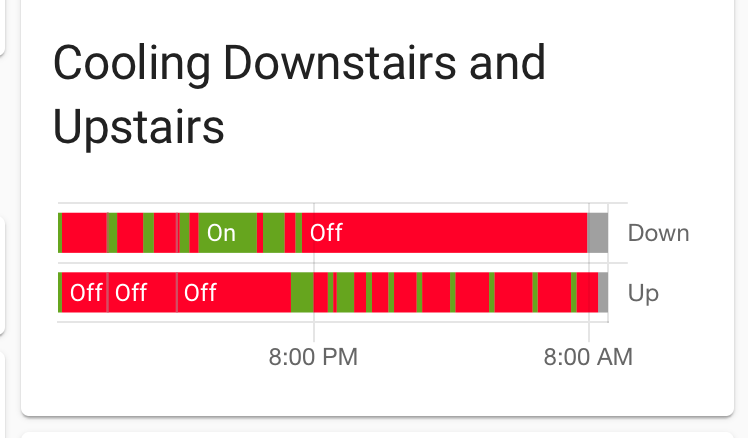
This tells me that the downstairs A/C ran quite a bit yesterday afternoon, but didn’t run at night. The upstairs started running around 7PM to cool things off, and ran for short burst at night. (FYI, I have another page describing my issues with Nest. The graph above is actually from our new thermostats.) Just to be clear, this HVACmon device will work with any brand of thermostat.
Optional Cooling defeat feature
Georgia Power offers several rate plans, one of which includes a ‘peak usage’ charge where part of your bill is based on how much electricity you used during the worst one hour period in the month. I’ve been trying to figure out how to take advantage of this plan by lowering the peak usage at my house. Part of that scheme would be to disable the A/C briefly during high use times, and that is the point of the Cooling defeat feature. It gives Home Assistant the ability to disable the A/C, and is just a simple relay built to disconnect the yellow wire. The idea is you would route the Y wire through the HVACmon, then on to the HVAC system, rather than simply just monitor the Y signal.
So far I have not implemented this feature, but I’d like to. The HVACmon will let me do that some day.
Secondary Cooling feature
Recently I upgraded the HVAC system to include dual-stage cooling, in addition to dual-stage heat. I had to go back to a previous version of HVACmon, that does not have the cooling defeat feature but can monitor both the Y and Y2 lines.
Dual-stage cooling allows the A/C units to run at about 60% capacity for awhile, before switching to 100% capacity. This is advantageous when you want dehumidification, but don’t need full blast cooling. This week, for example, in late October, the days are warmish (75) and there is some rain, so dehumidification is really all we need. Here’s a diagram showing what happened recently:
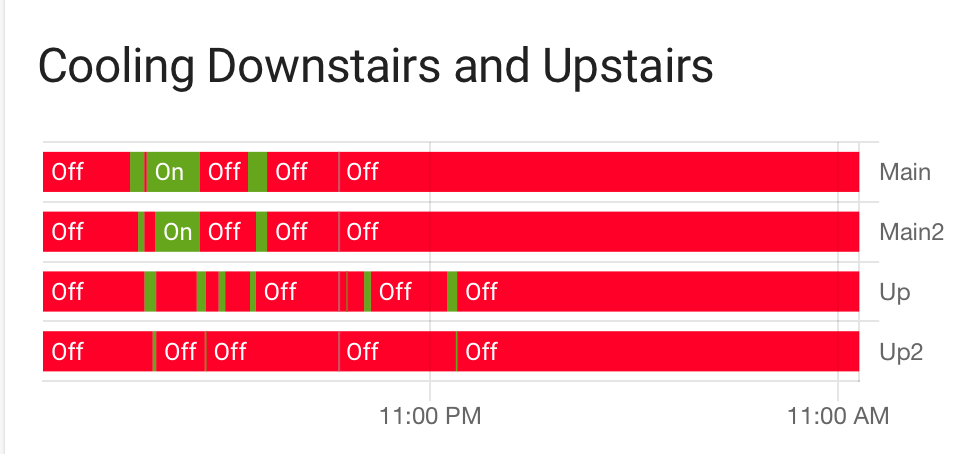
During the day, the Main floor HVAC did need full 100% cooling, and that’s shown as big blocks of green on both the “Main” and “Main2” rows. But during the day and overnight, the upstairs got along fine with just the first stage cooling (“Up”), and the 2nd stage (“Up2”) kicked in only very briefly.
I’m a little annoyed about the cooling algorithm our thermostats use. We currently have Radio Thermostat CT101 units, which I do like a lot. But their dual-stage algorithm is pretty simple: run the first stage for 15 minutes, then kick in the 2nd stage until the desired temperature is reached. Really? That’s it? I was hoping for something more elaborate, to take full advantage of the dual-stage feature (which costs quite a bit more…). Maybe I’ll need to research other thermostats, and maybe (!!??!!) go back to Nest.
However, so far the home residents seem to think this system gives a better feel in the house. We shall see how it goes.
Conclusion
This was a fun project that combined electronics and home automation and has led to improvements in our house. I have a few extra prototypes available, so let me know if you are interested in having one at your place.
